There’s no season that’s tougher for beekeepers than winter. Beekeeping during the winter season is even more challenging if you’re just starting out. Nonetheless, you still have the power to not only limit the undesirable effects, but also to optimize where your bees live.
You can improve your bees’ chances of surviving winter by protecting them against cold winds, venting away moisture and condensation, and keeping away pests and predators.
With planning, you can keep your bees alive throughout winter and increase your chances of a booming harvest in the following seasons. First, let’s look at why beekeeping in winter can be so difficult.
Overwintering Risk Factors
What are the problems you and your bees might be facing during the coldest of seasons?
Starvation
The number one problem bees face during winter is starvation. Yet most of their food problems are caused by humans. Yes, it’s our poor harvesting methods that lead to inadequate food for our bees.
Any beekeeper who empties out the honey stores will ultimately end up starving the bees. A well-populated bee hive needs at minimum 100 lbs. of honey stores to survive through winter. You should therefore keep watch on the reserves at all times.
For instance, if one frame can store 10 lbs., then multiply that with the number of frames in the hive. The results of a food shortage in winter will start becoming evident closer to spring.
Blocked Entryways
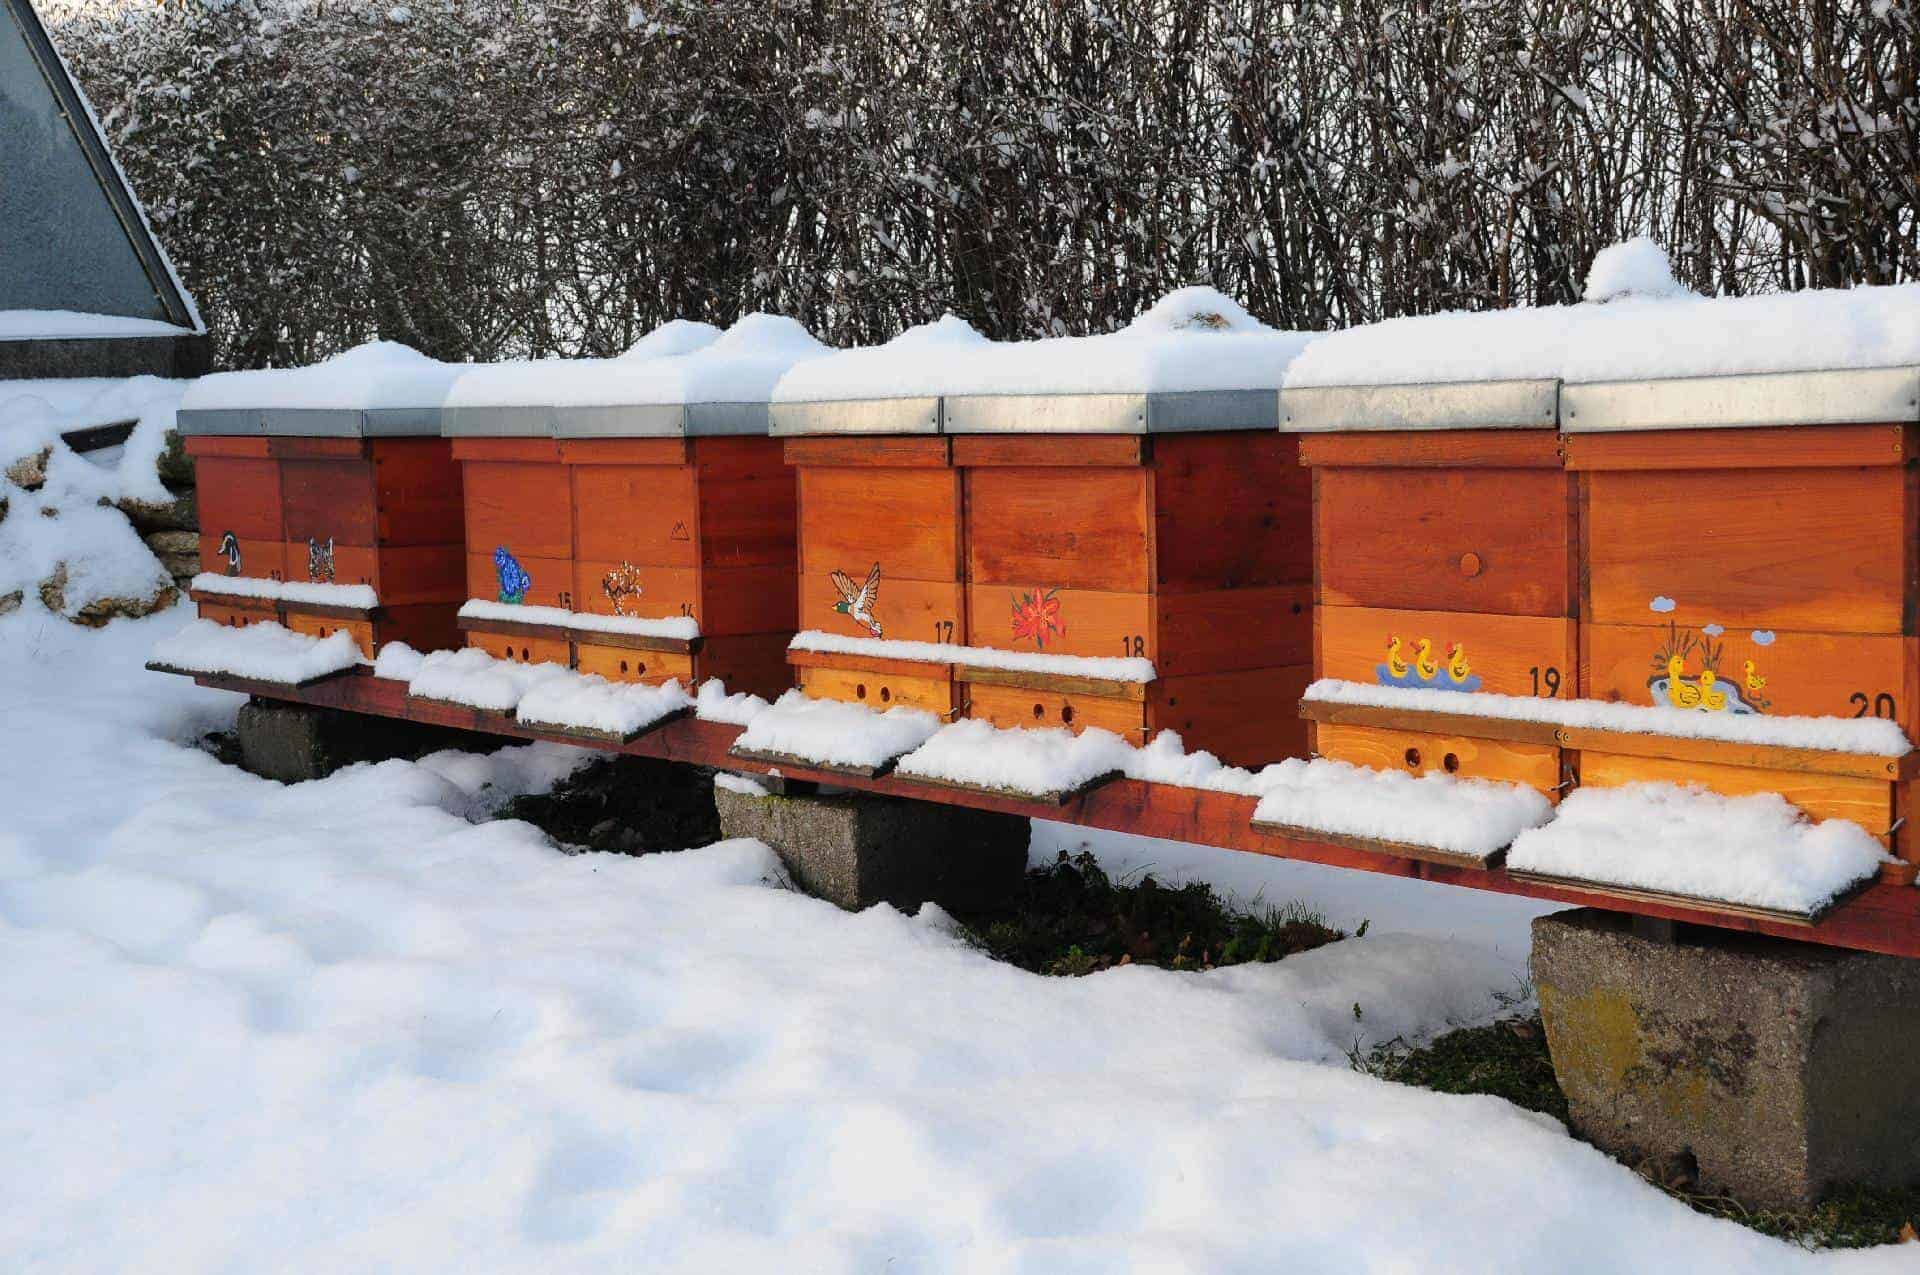
Bees keep their home very clean. They go out to defecate and to trash any debris they find inside their hives. These trips outside to keep the hive clean are known as cleansing flights. In winter, sometimes snow builds up and blocks the hive’s exits and entrances.
When bees can’t conduct their cleansing flights, the hive becomes dirty and contaminated. This leads to diseases, infections, and suffocation. When a bee manages to claw its way past the snow and comes back to find the entrance blocked again, it’s likely to freeze to death trying to get back in.
To ensure the cleansing flights continue during winter, it’s imperative that the beekeeper regularly clears off all exits and entrances after every snowfall.
Predators
During winter, predators try a little harder to find food. Woodpeckers, foxes, badgers, wasps, mice, and many other predators are looking to feast on honey and even eat your bees.
Woodpeckers are especially common during winter months. Wasps habitually invade bee hives as the wasp queen hibernates during winter.
To boost the chances of your bees’ survival, install wasp traps at the entrance of the hive. To protect against the other creatures, ensure your hive is stable and can’t be knocked over by one of the larger predators. Bees are organized defenders and they will help you do the rest to stay safe.
Weak Queen
If the queen is old or feeble, chances are she may not make it through the tough winter months. For instance, queen bees have less than a 50-50 chance after their full second season.
To enhance the hive’s chances of survival, it could be prudent to re-queen your hive during fall. A youthful and healthy queen will likely lead a strong hive when spring arrives.
Pests and Diseases
Bees are riddled with pests and diseases throughout the year, more so during the winter months. For example, varroa mites (or varroa destructors) are one of the worst winter enemies of any bee hive. They invade the hive and populate at a very fast rate. The varroa mite lives in the bee’s throat and if not controlled, they may quickly wipe out your hive.
To protect against varroa mites, use a mesh floor to trap them and let them fall through to a tray below. There are chemical treatments that can help control this might. You may also apply finely ground sugar to remove the mites.
Take action to eradicate diseases before winter sets in. Diseases such as Chalkbrood and Foulbrood pose a serious threat so you should conduct a keen examination of your hive during fall. Once winter sets in, it will be more difficult to control any diseases that have set in.
Collapse of Colony
Sometimes, for no clear reason, bees decide to simply vacate a hive. Some of the known reasons can be controlled. For instance, disease control increases chances of the bees staying put. Making it difficult for predators to access the hive also boosts chances of your hive population remaining.
Once winter sets in, monitor the hive for early warnings of a mass evacuation. For example, you can press your ear to the side of the hive to feel the heat they generate. When it’s warm, then your bees are active and at home. If the temperature drops drastically, then your bees are probably thinning out and vacating the hive.
During winter, bees uncap their honey stores to feed. So the presence of tiny bits of wax on the mesh floor can be an indication that your bees are healthy and happy with their home.
Improve the chances of your hive thriving during winter by keeping the hive area dry. Ensure they have enough food stocks and chase away any woodpeckers from the surrounding area.
Freezing Temperatures
Extreme temperatures and rapid variations in temperature can negatively affect your bees. Bees react quickly to changes in their environment. When they experience cold, they cluster together to generate heat. When it’s hot, they disperse. Often, when it changes from hot to cold quickly, some bees may not make it to the cluster in time and you may lose a sizable population to freezing.
To protect your bee hive from adverse temperature changes, position your hive away from strong winds. You can use foliage or wind screens as cover from the cold winds. You may also wrap the hive with insulating covers to provide a neutral temperature. Another option is to use beehive heaters, especially in the peak of winter.
Signs Of An At-Risk Colony
There are some red flags you can spot in late fall or early winter. These warning signs can point to an increased risk of your hive dying off before the winter season is over. Some of the red flags to watch out for include:
Overpopulation
Huge bee colonies are the most susceptible to dying off in the initial phases of winter. The major reason is that varroa mites spread fastest in a large colony. Colonies that split early are more likely to survive.
Too Much Honey
When there’s too many bee deaths, they leave behind a large stockpile of honey stores. If your hive shows it has too much honey in the frames, the bees are most likely dying off in large numbers. Probably from an attack by varroa destructors.
Small Colony
A small colony can’t adequately defend itself from predators such as wasps. Additionally, when the cold hits and the bees have to cluster to generate heat, a small cluster will have to move in tighter. This increases the pace of the spread of varroa mites and diseases within the colony.
Empty Bottom Boards
An empty bottom board is usually a sign that your bees are either vacating the hive or dying outside the hive when they go for their cleansing flights. Normally the bottom board holds piles of dead bees. Too many dead bees can be a sign of starvation, pest infestation, or disease.
Parasitic Mite Syndrome (PMS)
When bees are dying in large numbers at the time when they emerge, it could be a sign of Parasitic Mite Syndrome. That means the bees development has been affected by varroa mites or beetle mites.
Colony Collapse Disorder (CCD)
Colony Collapse Disorder is when the worker bees vacate the hive, leaving behind the queen bee and brood bees. They leave behind a large amount of honey reserves. The hives can’t survive without the worker bees.
Colony Poisoning
Beekeepers should avoid using harmful pesticides on crops foraged by the bees.
Tips for Overwintering Honey Bees
Even without human assistance, bees manage to survive cold winter months. Nonetheless, there are a few things we can do to increase their chances of survival. To help bee colonies emerge at the onset of spring strong and ready to forage, we can:
Requeen
A hive with a young and strong queen and a healthy brood stands a greater chance of surviving the winter months. So it’s critical that you examine the hive just before winter sets in. If you can’t see the queen or the brood patterns look abnormal, then you should consider replacing the old queen with a new one.
If you decide to re-queen, keep the old queen in place until the colony accepts the new queen and begins laying eggs.
Merge Hives
If you have several hives where some look to be at risk, then consider merging some of them. However, keep in mind that colonies tend to be territorial. So you can’t just dump two colonies onto each other.
The merging process should be systematic and done in phases. Avoid merging the colonies during the swarming season. The best time for merging should be late summer or early autumn.
Also, avoid merging two weak colonies. It’s much better to merge a weak colony with a strong one. The most effective way to merge colonies is to use the newspaper method. The steps are as follows:
- Identify the stronger colony.
- Smoke and open the weaker colony.
- Move the frames so you have one deep hive with the best ten frames having the most capped brood, honey, and eggs.
- Smoke and open the hive of the stronger colony.
- Lay a single sheet of paper on top and poke some holes in it. This allows the hive’s odors to rise through.
- Place the hive of the weaker colony on top of the newspaper-covered stronger colony.
- Add some feeder with sugar syrup.
- Check the hive in about 10 days. The two colonies will have chewed through the newspaper and become one strong colony.
- Inspect the frames and pick the best 20. The ones with honey go to the top, the ones with the brood go to the bottom. The ones with pollen make up the middle.
- Shake the bees off the extra frames then clean and store them for future use.
Split Hives
A crowded hive may swarm and is susceptible to pest attacks, especially mites. Hence, sometimes it makes better sense to split a hive into two rather than have too many bees in one colony.
The best time to split a colony is mid-spring. That way, the two new colonies get time to adjust and build resources long before winter sets in. The colonies have all summer, right before the honey harvest season.
To split a colony into two:
- Ensure there are enough foraging resources to sustain both colonies.
- Do not split a new or immature colony. Only split colonies that have overwintered before.
- Introducing a new queen. The colony is equally capable of selecting its own queen. However, introducing a mated queen creates faster results.
- Set Up the New Hive
- Close to the old colony, set up a bottom board and a hive, ready to receive the split colony.
- Split the Brood
- From the old hive, take four or five frames of brood at different development stages. Ensure there are eggs and larvae in both hives.
- Split the Nectar and Pollen
- Pick out a few frames from the old hive and shake them into the second box. Ensure you don’t take the original queen with you.
- Close the hive and you’re good to go.
- Keep checking the new hive to ensure they create a queen and to also check that stronger hives are not stealing honey from the newly created small colonies.
Wrap Hives
As winter approaches, it’s critical that you wrap your hives with a material like tar paper. The wrap ensures that your bees are not exposed to cold winter winds. Tar paper is breathable and allows in fresh air while not holding moisture.
Avoid Exposure
Once winter closes in, don’t keep opening your hives to check on the bees. Opening the hive releases all the warmth the bees have generated in there.
Simply let the bees, with the aid of nature, do their own thing. You can monitor from afar without opening the hive.
Clean Equipment
You have been using your equipment over and again to maintain your hives. As winter approaches, this might be the best time to clean all your tools and equipment. Otherwise they might become breeding ground for pests.
Order More Bees on Time
During winter, you’re likely to lose a large population of bees. If one or some of your hives look too thinly populated, account for the expected deaths and order new bees in time.
A well populated hive makes a strong colony. With more bees, they will be better able to cluster during those cold winter days and nights.
Feed Bees When Necessary
With enough honey, a colony can easily survive the winter. However, quite often during the onset of fall you may discover that your colony’s stores are inadequate.
If left like that, the bees will surely die of starvation or freeze before winter is over. To save your bees, provide them with additional nutrition and feeding stimulants. You can feed them candy, granulated sugar, or sugar syrup.
Common Overwintering Mistakes to Avoid
Honeybees are well adapted to live through winter. They may lose some, or even most, of their worker bee population but they always emerge in spring to repopulate and thrive.
However, beginner beekeepers tend to make mistakes that sabotage the survival of bees during winter. It’s common for humans to inadvertently put their bees at risk even with the good intention of protecting the hive. Here are some common mistakes you should avoid when overwintering your honey bees.
Feeding Your Bees Pollen
Beginner beekeepers are often confused about what to feed their bee colonies during winter. If the honey reserves are in plentiful supply, you don’t have to do anything. The bees will fend for themselves.
However, if you have to feed them, avoid giving them pollen. Bees use pollen to feed their babies. Pollen is their number one source of protein and helps the babies grow strong and active.
During winter, bees hibernate and it’s not the time to support the growth of baby bees. When you feed pollen the queen will lay more eggs and produce babies which will overwhelm the existing resources.
The worker bees will have to go out often to take care of the babies’ needs. This will result in many unnecessary deaths due to freezing conditions.
Opening The Hive
As a beekeeper you’re concerned about the health and welfare of your busy. However, you should resist the temptation of opening the hive during winter.
Bees cluster together to create heat between them. They flap their wings and vibrate their wing muscles to increase their body temperature and to create a warm environment inside the hive. When you open the hive, you release all that warm air and introduce the freezing air from the environment.
This means the bees will have to work extra hard to bring the temperature back up. They will have to flap their wings harder and for longer. They will also consume more of their reserve honey stocks to find the strength to create extra energy. By peeking into the hive even for a few seconds, you will have inadvertently harmed the whole colony and put them at greater risk of dying off.
Improper Wrapping
When humans are cold, we want to blanket up and cover ourselves in warm clothing. It’s a good idea to cover our bees too and keep them warm. However, there is a right way and wrong way of wrapping your hive.
Improper wrapping often traps moisture inside the hive. When the moisture freezes over this makes the hive colder. Additionally, the moisture introduces conditions where mold and mildew can grow inside the hive, bringing disease and infections to the colony.
The right way to wrap your hive is to leave a gap between the hive and the wrap. This ensures adequate flow of air with no moisture being trapped inside. Also, use the right materials for your wrap. Some of the best materials include:
- Breathable polyester
- Waterproofed Cotton
- Plastic with telescoping cover
- Styrofoam materials
- Tar paper
Can You Open A Bee Hive In Winter?
Conducting a hive inspection during the cold winter season is generally a bad idea. Bees don’t hibernate, they spend their winter days in clusters to maintain optimal temperatures. Your bees need their hive to be at about 95 degrees Fahrenheit (35 degrees Celsius).
However, if you really need to take a peek to ensure your bees are okay, then wait until temperatures are at least 60 degrees Fahrenheit (15 degrees Celsius).
The best time to inspect the hive is when the bees are out foraging. Bees can’t fly when the temperature is below 50 degrees Fahrenheit (10 degrees Celsius). Additionally, temperature isn’t the only factor to consider when you want to inspect the hive in winter.
Bee Activity
As mentioned above, the best time to inspect a hive is when the worker bees are out foraging. This is because disturbing the colony when it’s full will result in the colony becoming defensive. Also, when the hive is full you’re likely to squash some of the bees when you’re inspecting the frames and other parts.
Time of Day
The time of day varies depending on the conditions inside and outside the hive. In most instances, the best time of day would be between mid-morning and mid-afternoon when the winter temperatures have risen to their peak.
Sunshine
It’s still possible to inspect hives when the temperature is below 50 degrees Fahrenheit (10 degrees Celsius). However, you should pick a day and time when there’s a little bit of sunshine. It helps a lot if your hive is covered with black tar paper that absorbs the sun’s warm rays.
Make the inspection quick. If you’re feeding your bees, only open the top outer cover. Only feed fondant and avoid feeding pollen.
When Not To Open Your Bee Hive
If you have to inspect your hive during winter, do not do it too often. Otherwise the bees might decide to vacate the hive for a more peaceful home. Avoid opening the bee hive for inspections when:
- The temperature is below 50 degrees Fahrenheit (10 degrees Celsius).
- The weather is cloudy, stormy, or windy.
- It’s raining or snowing. You might let water into the hive.
- It’s after dark. Bees don’t like to be disturbed at night.
How To Prepare Your Hives for Winter
There is no universal way to prepare your hives for overwintering. Winter conditions are different in every part of the world. Some areas experience mild winters while others experience extremely harsh conditions.
Also, different honeybee species react differently to their environment. However, there are some general considerations and actions to take regardless of where you come from.
- Condense the Hives
- Reduce the boxes to a lower deep brood box and a smaller upper honey box.
- Remove any empty frames and put in frames that have eggs and honey. Merge hives to accomplish this. Make sure you leave lots of space at the bottom of the deep brood box. The bees need storage and breeding space.
- Conduct mite testing and treatment. This should be done before the onset of winter. Check for varroa mite levels. You can use a sticky board, alcohol washes, or sugar rolls to check the population of mites.
If the mites’ population is close to or above 2 mites per 100 bees, then you should start a treatment program. Some prevention and treatment measures include:
- Cultural approaches to reduce mite reproduction.
- Mechanical approaches such as mite trapping and screening the bottom board.
- Chemical approaches such as using organic acids and essential oils. If the mites are too many, consider using harsh chemicals such as amitraz.
Feed your bees. Before you condense your hives, the bees store most of their honey reserves high in the supers. When winter sets in, the bees will be clustered down in the brood box and it will take much effort to reach the honey reserves.
Put a bucket of syrup in the lower brood box for easy access to nutrition when they start clustering. The bees will use the syrup to keep some storage in the brood box.
Flip the boxes. Put the honey box at the bottom and the brood box at the top. When you leave the boxes with the deep below, the queen will move upwards where it’s warm and lay eggs there. Once you flip the boxes, put a queen excluder in between. This way, the queen lays in the brood box and the honey reserves remain pure.
Remove the syrup once the bees have shored up the resources in the bottom board. Add vent covers such as Vivaldi boards to trap moisture to vent any water out of the hive.
Conclusion
Bees keep warm in winter by clustering and exercising their muscles to expend energy. Wind is more harmful to bees than the cold. So protecting with foliage and wraps is always a good idea as winter approaches.
Avoid opening the hive as much as you can. However, if you must carry out an inspection, ensure you do it at the right time and within the right conditions. By protecting your bees from harsh winter weather, you can look forward to a healthy honey flow in spring.


